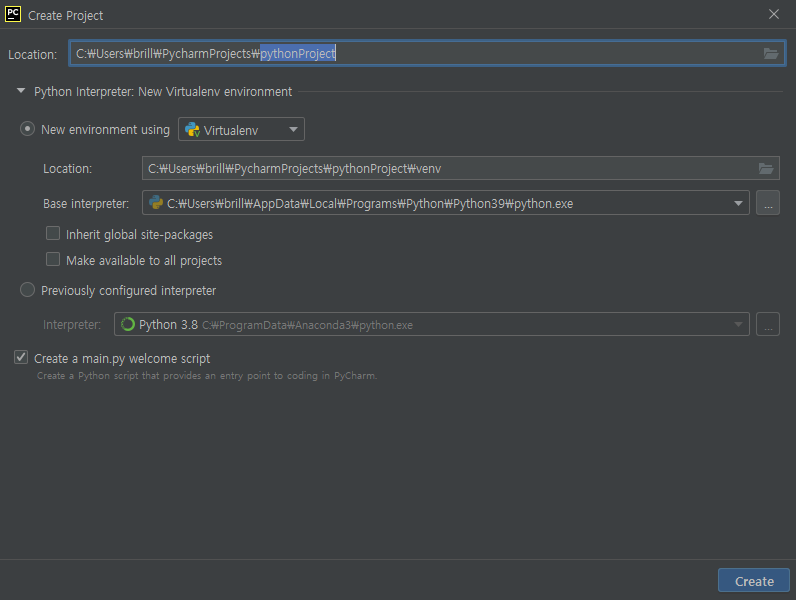
pycham을 실행하여 project file을 만들어도 되지만, 원하는 directory에 file 을 만들고, 그 file에서 pycharm을 실행 해도 된다.
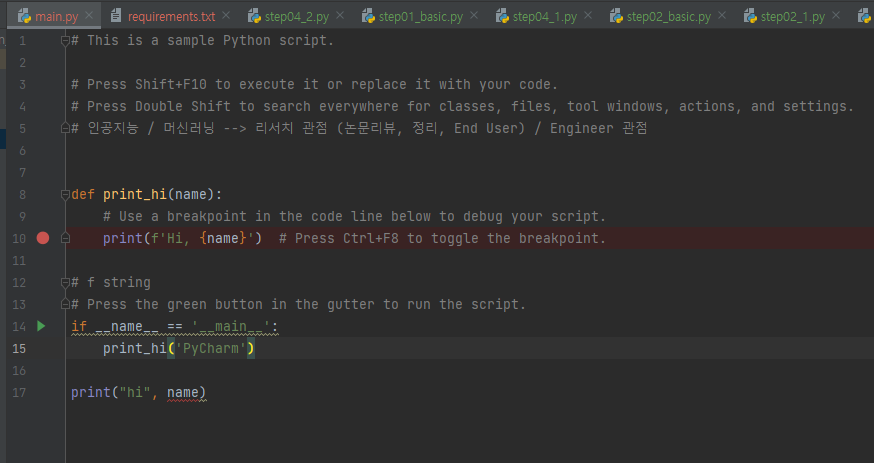
2. main.py :
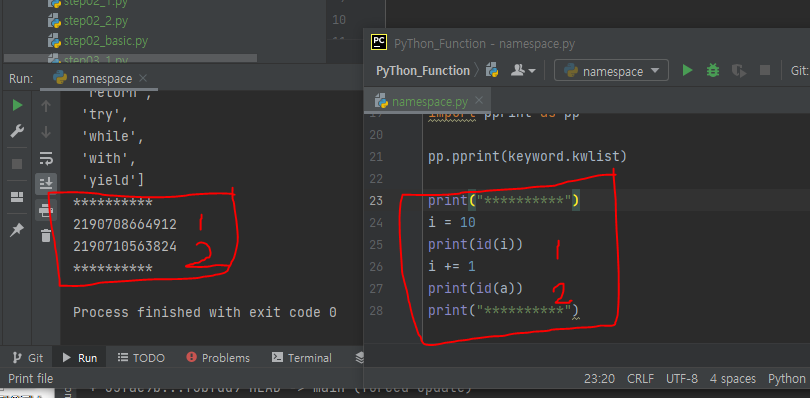
stop point
1 2 3 4 5 6 7 8 9 10 11 12 13
# This is a sample Python script. # Press Shift+F10 to execute it or replace it with your code. # Press Double Shift to search everywhere for classes, files, tool windows, actions, and settings. # 인공지능 / 머신러닝 --> 리서치 관점 (논문리뷰, 정리, End User) / Engineer 관점
defprint_hi(name): # Use a breakpoint in the code line below to debug your script. print(f'Hi, {name}') # Press Ctrl+F8 to toggle the breakpoint.
# f string # Press the green button in the gutter to run the script.
Requirement already satisfied: pandas in c:\users\brill\desktop\python_function\venv\lib\site-packages (1 .3.4) Requirement already satisfied: pytz>=2017.3 in c:\users\brill\desktop\python_function\venv\lib\site-packa ges (from pandas) (2021.3) Requirement already satisfied: numpy>=1.17.3 in c:\users\brill\desktop\python_function\venv\lib\site-pack ages (from pandas) (1.21.4) Requirement already satisfied: python-dateutil>=2.7.3 in c:\users\brill\desktop\python_function\venv\lib site-packages (from pandas) (2.8.2) Requirement already satisfied: six>=1.5 in c:\users\brill\desktop\python_function\venv\lib\site-packages (from python-dateutil>=2.7.3->pandas) (1.16.0) WARNING: You are using pip version 21.1.2; however, version 21.3.1 is available. You should consider upgrading via the ‘C:\Users\brill\Desktop\PyThon_Function\venv\Scripts\python.exe -m pip install –upgrade pip’ c ommand. (venv)
pandas 등을 하나씩 install 하는 방법도 있지만, file(requirements) 를 만들어 install 하는 방법도 있다.
series의 parameter는 data, index, dtype, name, copy, fastpath로 나뉘어져 있는데 name의 경우는 이름 인 것 같고 기본적으로 Index와 value라는 parameter를 많이 이용 하는 듯 하다.
Index : 배열의 이름
value : 값
python의 dictionalry와 거의 유사 한 것 같다.
(다음에 찾아보자 오늘은 벅참.)
series의 dtype에는 str, numpy.dtype, or ExtensionDtype, optional Data type 을 담을 수 있는데 이는 자동으로 값이 입력 되는 것같다.
series 객체를 생성 할 때 value와 Index를 직접 지정 해 줄 수 있다.
1 2 3 4
import pandas as pd sr = pd.Series([24000, 20000, 1000, 5000], index=["피자", "치킨", "콜라", "생맥"]) print(sr)
구글 코랩에서 작업 하고 있는데, 아래에 보면 series 객체의 parameter에대한 팝업이 나와 공부 하기 참 편하게 해 준다.
def init(data=None, index=None, dtype=None, name=None, copy=False, fastpath=False) One-dimensional ndarray with axis labels (including time series).
Labels need not be unique but must be a hashable type. The object supports both integer- and label-based indexing and provides a host of methods for performing operations involving the index. Statistical methods from ndarray have been overridden to automatically exclude missing data (currently represented as NaN). Operations between Series (+, -, /, *, **) align values based on their associated index values– they need not be the same length. The result index will be the sorted union of the two indexes.
Parameters
data : array-like, Iterable, dict, or scalar value
Contains data stored in Series.
index : array-like or Index (1d)
Values must be hashable and have the same length as data.
Non-unique index values are allowed. Will default to RangeIndex (0, 1, 2, …, n) if not provided. If both a dict and index sequence are used, the index will override the keys found in the dict.
dtype : str, numpy.dtype, or ExtensionDtype, optional
Data type for the output Series.
If not specified, this will be inferred from data.
See the user guide <basics.dtypes> for more usages.
아나콘다와 같은 IDE를 이용하여 작업 할 수도 있지만, 기본적으로 Import하여 편하게 사용 할 수 있다.
판다스의 이름은 계량 경제학에서 사용되는 용어인 **’PANel DAta’**의 앞 글자를 따서 지어졌다. 판다스는 R에서 사용되던 data.frame 구조를 본뜬 DataFrame이라는 구조를 사용하기 때문에, R의 data.frame에서 사용하던 기능 상당수를 무리없이 사용할 수 있도록 만들었다. 더욱이 파이썬이라는 접근성이 좋은 언어 기반으로 동작하기 때문에 데이터 분석을 파이썬으로 입문하는 사람들이 필수적으로 사용하는 라이브러리가 되었다.’
판다스 Import 하기
쥬피터 노트로 설치가 가능 하다고 하지만, 구글코랩이나 케글 노트에서는 Import하여 쉽게 사용한다.
1 2
import pandas as pd pd.__version__
pandas는 오픈소스로 누구나 무료로 이용 할 수 있고, Numpy, matplotlib등 다른 라이브러리들과 함께 쓰인다.
일반적으로 pandas는 pd로 import되기 때문에 pd.[function] 으로 써있으면 pandas 라이브러리를 이용한다고 생각 하면 된다.
Livraly의 경우 version 오류가 많이 있으므로, Import 해 주는 라이브러리는 version을 꼭 확인하여 오류에 대비 하도록 한다.
우리는 numpy를 import 하여 numpy에 내장되어 있는 함수를 가져와 쓸 수 있다. 일반적으로 np에 저장하여 많이 사용 하는 듯 하다.
1 2 3 4 5 6 7 8 9
import numpy as np print(np.__version__)
print ("Numpy의 version을 확인 해 볼 수 있다. ")
temp = np.array([1, 2, 3]) print(type(temp))
print ("Numpy의 type은 nd array인 것을 볼 수 있다. ")
1.19.5
Numpy의 version을 확인 해 볼 수 있다.
<class 'numpy.ndarray'>
Numpy의 Type을 보면 nd array 인 것을 볼 수 있는데
ND : N dimension 을 의미한다. 즉 한국어로 번역 해 보면 N차 행렬 정도로 볼 수 있다.
Numpy 에서 배열을 생성 해 보자.
1차원 배열 생성
1차원의 배열을 생성해서 array와 List의 다른 점을 알아보자.
차이점은 shpae를 찍어 보면 알 수 있다. 내장 함수 : (fuction or method or attribute)
1 2 3 4 5 6 7 8 9 10 11 12 13 14 15 16 17 18
data1 = [0, 1, 2, 3, 4]
data2 = [10, 9, 8, 7, 6]

My_array = np.array(data1)

print("data1은 List이다. ")
print(data1)
print(type(data1))
#print(data1.shape)
#List의 경우 shape 함수가 내장 되어 있지 않아 shape를 알 수 없다.
print("My_array은 numpy형식의 tuple인 것을 알 수 있다.  ")
print(My_array)
print(My_array.shape)
print(type(My_array))

print(".dtype() 는 data의 type을 확인 할 수 있는 function 이다.")
print(My_array.dtype)
data1은 List이다.
[0, 1, 2, 3, 4]
<class 'list'>
My_array은 numpy형식의 tuple인 것을 알 수 있다.
[0 1 2 3 4]
(5,)
<class 'numpy.ndarray'>
.dtype() 는 data의 type을 확인 할 수 있는 function 이다.
int64
List 형식의 경우 shape 함수가 내장 되어 있지 않은 반면, numpy 형식의 np.array 의 경우 tuple shape 함수가 내장 되어 에러가 나지 않과 (5, )의 형태로 result가 나오는 것 을 볼 수 있다.
.dtype() 는 data의 type을 확인 할 수 있는 function 이다. 이때 나타나는 int 64는 64byte의 타입 이라는 것을 알려 준다.
Zeros_Array
[[0. 0. 0.]
 [0. 0. 0.]]
Data Type is: float64
Data Shape is: (2, 3)
Ones_Array
[[1 1 1 1]
 [1 1 1 1]
 [1 1 1 1]]
Data Type is: int32
Data Shape is: (3, 4)
8행에 보면 Array를 행성 하면서 dtype을 int32로 지정 해 준 것을 볼 수 있다.
Zeros_Array의 경우 채워진 0들이 모두 float type의 실수 이기 때문에 0. 이라고 나타는 것을 볼 수 있지만, Ones_Array의 경우 1 만 나타난 Int 형태의 type인 것을 볼 수 있다.
reshape
reshape는 행렬의 모양을 바꿔주는 함수이다. 행렬의 모양을 바꿀 때에는 약간의 제약이 있는데 예를 들어 설명 해 보자면,
3X4 = 12, 6X2 =12로 형태 변환을 할 수 있지만, 3X5 = 15이기 때문에 변환이 불가능 하다. 이것이 이해가 가지 않는다면 중학교로 돌아 가야 할 지도 모른다.