[Kgg]Tabular Playground Series (Dec. 2021)

Tabular_Playground_Series_Dec(2021)


origin of dictation


이어지는 포스팅 :
Kgg_TPS 02

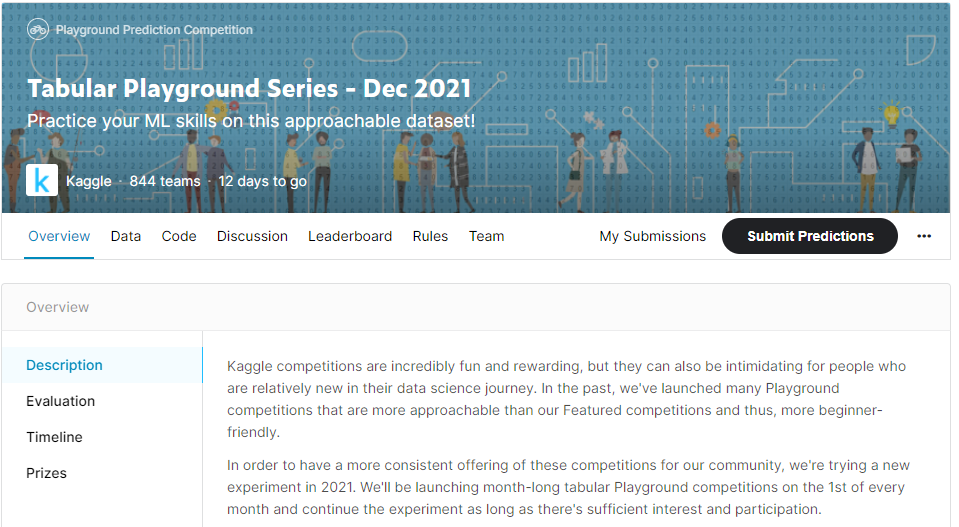
Description of competition

data overview

TPS12_overView

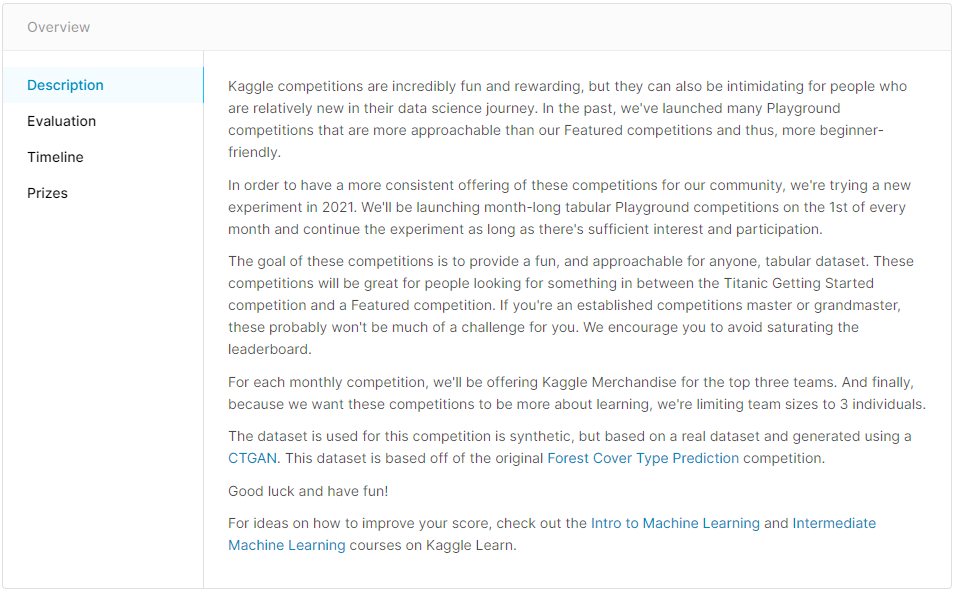
Kaggle에서 매달 1일에 data scientists의 Featured competitions을 위해 beginner- friendly로 제공하는 대회


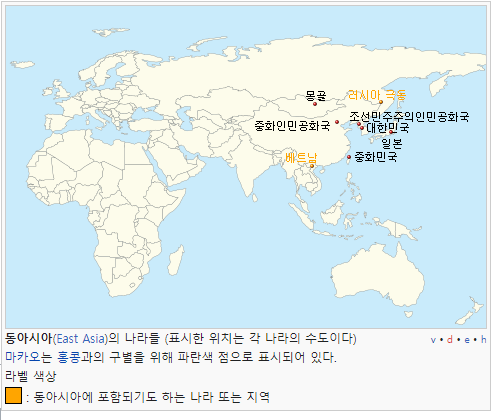
The study area includes four wilderness areas located in
the Roosevelt National Forest of northern Colorado.
Each observation is a 30m x 30m patch.
You are asked to predict an integer classification for the forest cover type(FCT).


The seven types are:

1 - Spruce/Fir
2 - Lodgepole Pine
3 - Ponderosa Pine
4 - Cottonwood/Willow
5 - Aspen
6 - Douglas-fir
7 - Krummholz

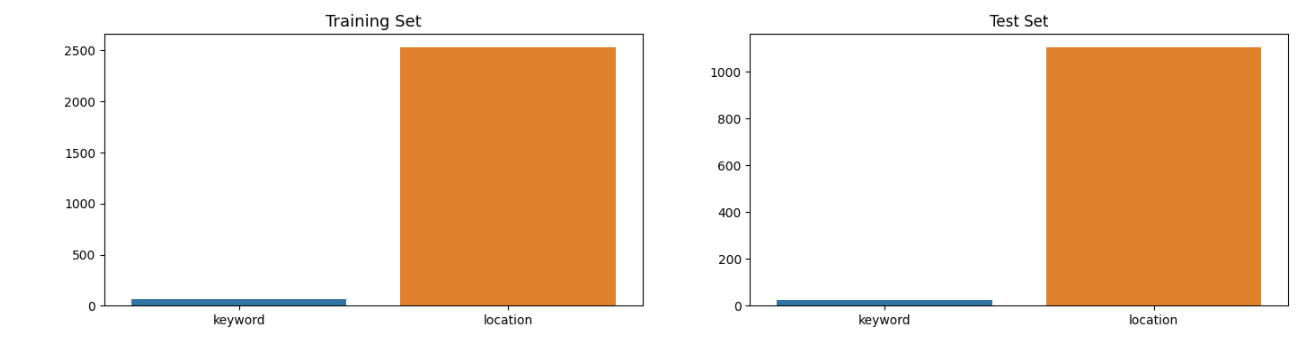
The training set (15120 observations) contains both features and the Cover_Type.
The test set contains only the features.
You must predict the Cover_Type for every row in the test set (565892 observations).


Data Fields


Elevation - 미터 단위 고도
Aspect - 방위각의 종횡비 (위치)
Slope - 경사 기울기
Horizontal_Distance_To_Hydrology - 해수면까지의 수평거리
Vertical_Distance_To_Hydrology - 해수면까지의 수직거리
Horizontal_Distance_To_Roadways - 도로와의 수평 거리
Hillshade_9am (0 to 255 index) - 여름, 오전 9시 Hillshade
Hillshade_Noon (0 to 255 index) - 여름, 정오 Hillshade
Hillshade_3pm (0 to 255 index) - 여름, 오후 3시 Hillshade
Horizontal_Distance_To_Fire_Points - 산불 발화점까지 수평거리

Wilderness_Area

: 야생지역
- 4 개의 columns (토양 유형 지정)
+ 0 = 없음
+ 1 = 있음

Soil_Type

: 토양 유형 지정
- 40 개의 columns
+ 0 = 없음
+ 1 = 있음


Cover_Type

FCT 지정
br> - 7 개 columns

+ 0 = 없음

+ 1 = 있음


The wilderness areas are:


1 - Rawah Wilderness Area
2 - Neota Wilderness Area
3 - Comanche Peak Wilderness Area
4 - Cache la Poudre Wilderness Area


The soil types are:


1 Cathedral family - Rock outcrop complex, extremely stony.

2 Vanet - Ratake families complex, very stony.

3 Haploborolis - Rock outcrop complex, rubbly.

4 Ratake family - Rock outcrop complex, rubbly.

5 Vanet family - Rock outcrop complex complex, rubbly.

6 Vanet - Wetmore families - Rock outcrop complex, stony.

7 Gothic family. Na

8 Supervisor - Limber families complex.

9 Troutville family, very stony.

10 Bullwark - Catamount families - Rock outcrop complex, rubbly.

11 Bullwark - Catamount families - Rock land complex, rubbly.

12 Legault family - Rock land complex, stony.

13 Catamount family - Rock land - Bullwark family complex, rubbly.

14 Pachic Argiborolis - Aquolis complex.

15 unspecified in the USFS Soil and ELU Survey. (Na)

16 Cryaquolis - Cryoborolis complex.

17 Gateview family - Cryaquolis complex.

18 Rogert family, very stony.

19 Typic Cryaquolis - Borohemists complex.

20 Typic Cryaquepts - Typic Cryaquolls complex.

21 Typic Cryaquolls - Leighcan family, till substratum complex.

22 Leighcan family, till substratum, extremely bouldery.

23 Leighcan family, till substratum - Typic Cryaquolls complex.

24 Leighcan family, extremely stony.

25 Leighcan family, warm, extremely stony.

26 Granile - Catamount families complex, very stony.

27 Leighcan family, warm - Rock outcrop complex, extremely stony.

28 Leighcan family - Rock outcrop complex, extremely stony.

29 Como - Legault families complex, extremely stony.

30 Como family - Rock land - Legault family complex, extremely stony.

31 Leighcan - Catamount families complex, extremely stony.

32 Catamount family - Rock outcrop - Leighcan family complex, extremely stony.

33 Leighcan - Catamount families - Rock outcrop complex, extremely stony.

34 Cryorthents - Rock land complex, extremely stony.

35 Cryumbrepts - Rock outcrop - Cryaquepts complex.

36 Bross family - Rock land - Cryumbrepts complex, extremely stony.

37 Rock outcrop - Cryumbrepts - Cryorthents complex, extremely stony.

38 Leighcan - Moran families - Cryaquolls complex, extremely stony.

39 Moran family - Cryorthents - Leighcan family complex, extremely stony.

40 Moran family - Cryorthents - Rock land complex, extremely stony.

  • 경사(Slope) : 어떤 지점의 지반이 수평을 기준으로 몇도 기울어져 있는가
    • θ(theta) 로 표현
    • 각이 클 수록 지반의 경사가 급하고 각이 0이면 평편한 지반
  • 향(Aspect): 지반의 경사면이 어디를 향하는가
    • 북: 0도, 동: 90도, 남: 180도, 서: 270도.
    • 완전히 평편할 경우 GIS 시스템마다 다른 값, Null 가능, (-1과 같은 값이 적당)

Ref.


Evaluation

TPS12_Evaluation

각각의 ID 를 cover type 과 Matching하여 file format 형태를 만들어 제출 하면 됩니다.

kaggle HeatMap

HeatMap

python문법의 plotly Library를 이용하여 Heatmap을 알아보자

  • HeatMap의 Gradation 색을 바꾸고 싶다면, colorscales 을 참고 해 보자.

HeatMap 1

1
2
3
4
5
6
7
8
import plotly.figure_factory as ff

z=[[1, 90, 30, 50, 1], [20, 1, 60, 80, 30], [30, 60, 1, 50, 20]]
x=['Monday', 'Tuesday', 'Wednesday', 'Thursday', 'Friday']
y=['Morning', 'Afternoon', 'Evening']

fig = ff.create_annotated_heatmap(z, x = x, y = y, colorscale = "Viridis")
fig.show()

Input data를 맞춰 줘야한다.

  • x, y = List
  • z= 배열

heatmap

HeatMap 2

1
2
3
4
5
6
7
8
9
10
11
12
13
14
15
16
17
18
19
20
21
22
23
24
25
26
27
28
29
import plotly.graph_objects as go
from functools import reduce
from itertools import product

z=[[1, 90, 30, 50, 1], [20, 1, 60, 80, 30], [30, 60, 1, 50, 20]]
x=['Monday', 'Tuesday', 'Wednesday', 'Thursday', 'Friday']
y=['Morning', 'Afternoon', 'Evening']

def get_anno_text(z_value):
annotations=[]
a, b = len(z_value), len(z_value[0])
flat_z = reduce(lambda x,y: x+y, z_value) # z_value.flat if you deal with numpy
coords = product(range(a), range(b))
for pos, elem in zip(coords, flat_z):
annotations.append({'font': {'color': '#FFFFFF'},
'showarrow': False,
'text': str(elem),
'x': pos[1],
'y': pos[0]})
return annotations

fig = go.Figure(data=go.Heatmap(
z=z,
x=x,
y=y,
hoverongaps = True))

fig.update_layout(annotations = get_anno_text(z))
fig.show()

HeatMap2

HeatMap 3

1
2
3
4
5
6
7
8
9
10
11
12
13
14
15
16
17
18
19
20
21
22
23
import plotly.graph_objects as go

z = df.groupby(['Q4', 'Q1']).size().unstack().fillna(0).astype('int16')
# convert to correlation matrix
z2 = z.apply(lambda x:x/x.sum(), axis = 1)

x = z2.columns
y = z2.index

fig = go.Figure(data=go.Heatmap(
z=z2.to_numpy(), #dataframe을 넘파이(배열)로 바꿔줌: List형태
x=x,
y=y,
type="heatmap",
colorscale = "Viridis",
hoverongaps = False))

fig.update_layout(
title='Degree ~ Gender',
xaxis_nticks=36)

fig.show()

HeatMap3

  • z2 = z.apply(lambda x:x/x.sum(), axis = 1)
  • 여기서 이 한줄로 인해 dataFrame이 Heatmap에 들어 갈 수 있는 상관관계G를 만들 수 있는 상태로 변환.
  • data 자료형을 맞춰줘야 한다. (x, y, z)

HeatMap Ref.

Ref.

[object Object]

#Plotly Tutorial For Kaggle Survey Competitions


진도가 너무 더디게 나가서 Teacher’s code를 조금더 뜯어 본후

python for문이나 if문을 조금 더 잘 쓸 수 있을기를 바란다.


kaggle in East-Asia(data둘러보기)

Kaggle in East Asia


0. introduction

1. World Vs East Asia

  1. Kgg 응답자 수
  2. Kgg 응답자 중 직업
    1.

2. East Asia

3. interestings

  • Tenure: 17y 경력? Q6(20y) Q8(18y) Q15(19y) Q6(20, 21y)
  • FormalEducation: 17y 학력, Q4 in 18y, 19y, 20y
  • 전공 Q5 in18y
  • compensation for year: Q10 in 18y,19y, Q24 in 20,
1
2
3
4
5
6
7
8
9
10
11
12
13
14
15
16
17
18
19
20
21
22
23
24
25
26
27
28
29
# 연도별 나이 
df21Age_Ea = df21_Ea.loc[:,['Q3','Q1']].reset_index().rename(columns={'Q3':'East_Asia', 'Q1':'2021'}).fillna('etc')
df20Age_Ea = df20_Ea.loc[:,['Q3','Q1']].reset_index().rename(columns={'Q3':'East_Asia', 'Q1':'2020'}).fillna('etc')
df19Age_Ea = df19_Ea.loc[:,['Q3','Q1']].reset_index().rename(columns={'Q3':'East_Asia', 'Q1':'2019'}).fillna('etc')
df18Age_Ea = df18_Ea.loc[:,['Q3','Q2']].reset_index().rename(columns={'Q3':'East_Asia', 'Q2':'2018'}).fillna('etc')
df17Age_Ea = df17_Ea.loc[:,['Country','Age']].reset_index().rename(columns={'Country':'East_Asia', 'Age':'2017'}).fillna('etc')


#data frame 정리

dfAge21_percent =df21Age_Ea.groupby(['East_Asia','2021']).size().reset_index().rename(columns = {0:"Count"})
dfAge21_percent['percent'] =((dfAge21_percent['Count'] / len(df21Age_Ea))*100).round(2)
dfAge21_percent['percent_str'] =((dfAge21_percent['Count'] / len(df21Age_Ea))*100).round(2).astype(str) + '%'
# dfAge21['percent'] = ((media['Count'] / len(df))*100).round(2).astype(str) + '%'
# dfAge_percent21=dfAge21.value_counts('East_Asia',normalize=True).mul(100).round(1).astype(str)
dfAge21_percent


# 나라별 연령대 비율 in East Asia
fig = go.Figure()
for country, group in dfAge21_percent.groupby('East_Asia'):
fig.add_trace(go.Bar(
x = group['2021'], y = group['percent'], name = country, text=group['percent_str']
))
fig.update_layout(barmode="stack",
plot_bgcolor = "white",
title='2021_ 연령별 나라 비율 in East Asia')
fig.show()

Q1_EastAsia

1
2
3
4
5
6
7
8
9
10
11
12

# 연령별 나라 비율 in East Asia // 여기 name 어떻게 넣는거야 !!!!
fig = go.Figure()

for country, group in dfAge21_percent.groupby('2021'):
fig.add_trace(go.Bar(
x = group['East_Asia'], y =group['percent'], text=dfAge21_percent['percent_str']
))
fig.update_layout(barmode="stack",
plot_bgcolor = "white",
title='2021_ 나라별 연령 비율 in East Asia')
fig.show()

img_1.Q1_EastAsia

  • 못해먹겠다.

Metaplotly

kaggle in Korea(data둘러보기)

#How popular is kaggle in South Korea?


data 정제하기

1
2
3
4
5
6
7
8
9
10
11
12
13
14
15
16
17
18
19
20
21
22
23
24
df21_Ko = df21[df21['Q3'] == 'South Korea']
df21_Wo = df21[~(df21['Q3'] == 'South Korea')]
df21['region']=["Korea" if x == 'South Korea' else "World" for x in df21['Q3']]
df21['region'].value_counts()

df20_Ko = df20[df20['Q3'] == 'South Korea']
df20_Wo = df20[~(df20['Q3'] == 'South Korea')]
df20['region']=["Korea" if x == 'South Korea' else "World" for x in df20['Q3']]
df20['region'].value_counts()

df19_Ko = df19[df19['Q3'] == 'South Korea']
df19_Wo = df19[~(df19['Q3'] == 'South Korea')]
df19['region']=["Korea" if x == 'South Korea' else "World" for x in df19['Q3']]
df19['region'].value_counts()

df18_Ko = df18[df18['Q3'] == 'South Korea']
df18_Wo = df18[~(df18['Q3'] == 'South Korea')]
df18['region']=["Korea" if x == 'South Korea' else "World" for x in df18['Q3']]
df18['region'].value_counts()

df17_Ko = df17[df17['Country'] == 'South Korea']
df17_Wo = df17[~(df17['Country'] == 'South Korea')]
df17['region']=["Korea" if x == 'South Korea' else "World" for x in df17['Country']]
df17['region'].value_counts()

<<<<<<< HEAD

World 25615
Korea 359
Name: region, dtype: int64

World 19847
Korea 190
Name: region, dtype: int64

World 19536
Korea 182
Name: region, dtype: int64

World 23672
Korea 188
Name: region, dtype: int64

World 16522
Korea 194
Name: region, dtype: int64
=======


2021

  • World 25615
  • Korea 359
  • Name: region, dtype: int64

2020

  • World 19847
  • Korea 190
  • Name: region, dtype: int64

2019

  • World 19536
  • Korea 182
  • Name: region, dtype: int64

2018

  • World 23672
  • Korea 188
  • Name: region, dtype: int64

2017

  • World 16522
  • Korea 194
  • Name: region, dtype: int64

trouble shooting

data 정제를 하다 보니 전체 data에서 korea가 1% 밖에 되지 않아 data set을 더 추가 하기로 했다.

##동아시아
East Asia

Ref. East Asia

동아시아

  • East Asia에는 대한민국, 일본, 중국, 타이완, 몽골, 북조선 총 6개의 국가가 속해 있다.
  • 알 수 없지만, 18년도엔 타이완이 없다.
1
2
3
4
5
6
7
8
9
10
11
12
13
14
15
16
17
18
19
20
21
22
23
24
25
26
27
28
29
30
31
32
33
34
## East Asia에는 대한민국, 일본, 중국, 타이완, 몽골, 북조선 총 6개의 국가가 속해 있다. 
## 알 수 없지만, 18년도엔 타이완이 없다.

EastAsia17 = ['China',"People 's Republic of China", 'Taiwan', 'South Korea', 'Japan']
EastAsia18= ['China', 'South Korea', 'Japan', 'Republic of Korea']
EastAsia19 = ['China','Taiwan', 'South Korea', 'Japan', 'Republic of Korea']
EastAsia20 = ['China','Taiwan', 'South Korea','Republic of Korea', 'Japan']
EastAsia21 = ['China','Taiwan', 'South Korea', 'Japan']


EastAsia = ['Republic of Korea','China','Taiwan', 'South Korea', 'Japan', "People 's Republic of China" ]

df21_Ea = df21[df21['Q3'].isin(EastAsia)]
df21_Wo = df21[~df21['Q3'].isin(EastAsia )]
df21['region']=["EastAsia" if x in EastAsia else "World" for x in df21['Q3']]

df20_Ea = df20[df20['Q3'].isin(EastAsia)]
df20_Wo = df20[~df20['Q3'].isin(EastAsia )]
df20['region']=["EastAsia" if x in EastAsia else "World" for x in df20['Q3']]

df19_Ea = df19[df19['Q3'].isin(EastAsia)]
df19_Wo = df19[~df19['Q3'].isin(EastAsia )]
df19['region']=["EastAsia" if x in EastAsia else "World" for x in df19['Q3']]

df18_Ea = df18[df18['Q3'].isin(EastAsia)]
df18_Wo = df18[~df18['Q3'].isin(EastAsia )]
df18['region']=["EastAsia" if x in EastAsia else "World" for x in df18['Q3']]

df17_Ea = df17[df17['Country'].isin(EastAsia)]
df17_Wo = df17[~df17['Country'].isin(EastAsia )]
df17['region']=["EastAsia" if x in EastAsia else "World" for x in df17['Country']]


#df21['region'].to_frame().value_counts().to_frame().rename(columns={'region': '21y', '' : 'count'})

21년도 를 .value_counts()로 뽑아 냈다.

region_df21

1%대는 아니지만, 이제 10%대 data를 뽑아 냈다.

이것이 어떤 의미가 있을지 모르겠지만, 일단 주말동안 이 data로 궁금한 것을 Graph로 만들어 보자.

1
2
3
4
5
6
7
8
9
10
11
12
13
14
15
16
17
18
19
20
21
22
23
24
25
26
27
28
29
30
31
32
33
34
35
36
37
38
39
40
# % 계산을 위해 len() 을 통해 data 생성.

Ea21 = len(df21_Ea)
Wo21 = len(df21) - len(df21_Ea)

Ea20 = len(df20_Ea)
Wo20 = len(df20) - len(df20_Ea)

Ea19 = len(df19_Ea)
Wo19 = len(df19) - len(df19_Ea)

Ea18 = len(df18_Ea)
Wo18 = len(df18) - len(df18_Ea)

Ea17 = len(df17_Ea)
Wo17 = len(df17) - len(df17_Ea)


def percent (a, b):
result =a/(a+b)*100
return result

def percentR (b, a):
result =a/(a+b)*100
return result

country = ['East Asia', 'Rest of the World']

years = ['2017', '2018', '2019', '2020', '2021']

fig = go.Figure(data=[
go.Bar(name='Rest of the World', x=years, y=[percentR(Ea17, Wo17), percentR(Ea18, Wo18), percentR(Ea19, Wo19),
percentR(Ea20, Wo20), percentR(Ea21, Wo21)]),
go.Bar(name='East Asia', x=years, y=[percent(Ea17, Wo17), percent(Ea18, Wo18), percent(Ea19, Wo19),
percent(Ea20, Wo20), percent(Ea21, Wo21)])
])

fig.update_layout(barmode='stack')
fig.show()

일단, plot은 뽑아 보았는데 이래도 되나 싶다 ^^ 하하

노동력을 더해서 대륙 별로 뽑던지 해야겠다 ㅂㄷㅂㄷ

SrackFig1

072bc76c34c0f369e5fe7e814291408da6a83ffc

NLP_text_classification

##Kaggle _ API

  1. !pip Install Kaggle : Kaggle 설치
  2. google.colab에 kaggle.json files upload
    1. Saving kaggle.json to kaggle.json
    2. User uploaded file “kaggle.json” with length 66 bytes
    3. kaggle.json file에는 뭐가 들어있을까 너무 궁금하다.
  3. !kaggle competitions download -c nlp-getting-started
    1. 케글 대회 자료를 다운받기. (-c nlp-getting-started 이게 뭘까)
  4. data path 설정하기

##data 둘러보기

  1. data frame을 만들기 위해 Pandas와 numpy를 import후 각 file을 data set을 Load해 준다.
  2. data set 확인
    1. .head()로 대략적인 data set 확인
    2. .shape로 각 data set의 크기 확인
    3. .info()로 각 data frame의 정보 확인

##EDA
EDA

: 수집한 data를 다양한 각도에서 관찰하고 이해하는 과정

: 통계적 방법으로 자료를 직관적으로 바라보는 과정

  • data의 분포 및 값을 검토함으로써 데이터가 표현하는 현상을 더 잘 이해하고, 잠재적 문제를 발견 할 수 있다.
  • 문제를 발견하여 기존의 가설을 수정하거나 새로운 가설을 세울 수 있다.
  1. data visualiztion을 위해 matplotlib.pyplot과 seaborn 설치
    1. missing_colunms = [“keyword”, “location”]
    2. 각 data set에서 null인 columns를 가져온다.
  2. matplotlib.pyplot으로 bar plot 그리기
    MP_EDA

##Feature Engineering
##Mideling
##algorithm logistic regression

to prepare kaggle Competition

#Kaggle Competition 준비하기

Kaggle Note 에서 작성됨.

  1. files and Library import
1
2
3
4
5
6
7
8
9
10
11
12
13
14
15
16
17
18
19
20
21
22
23
import numpy as np
import pandas as pd
import seaborn as sns
import matplotlib.pylab as plt

import plotly.io as pio
import plotly.express as px
import plotly.graph_objects as go
import plotly.figure_factory as ff
from plotly.subplots import make_subplots
from plotly.offline import init_notebook_mode, iplot
init_notebook_mode(connected=True)
pio.templates.default = "none"
# import plotly.offline as py
# py.offline.init_notebook_mode()

import os
for dirname, _, filenames in os.walk('/kaggle/input'):
for filename in filenames:
print(os.path.join(dirname, filename))

import warnings
warnings.filterwarnings("ignore")

result

/kaggle/input/kaggle-survey-2018/SurveySchema.csv /kaggle/input/kaggle-survey-2018/freeFormResponses.csv /kaggle/input/kaggle-survey-2018/multipleChoiceResponses.csv /kaggle/input/kaggle-survey-2017/freeformResponses.csv /kaggle/input/kaggle-survey-2017/schema.csv /kaggle/input/kaggle-survey-2017/RespondentTypeREADME.txt /kaggle/input/kaggle-survey-2017/multipleChoiceResponses.csv /kaggle/input/kaggle-survey-2017/conversionRates.csv /kaggle/input/kaggle-survey-2020/kaggle_survey_2020_responses.csv /kaggle/input/kaggle-survey-2020/supplementary_data/kaggle_survey_2020_methodology.pdf /kaggle/input/kaggle-survey-2020/supplementary_data/kaggle_survey_2020_answer_choices.pdf /kaggle/input/kaggle-survey-2021/kaggle_survey_2021_responses.csv /kaggle/input/kaggle-survey-2021/supplementary_data/kaggle_survey_2021_methodology.pdf /kaggle/input/kaggle-survey-2021/supplementary_data/kaggle_survey_2021_answer_choices.pdf /kaggle/input/kaggle-survey-2019/survey_schema.csv /kaggle/input/kaggle-survey-2019/multiple_choice_responses.csv /kaggle/input/kaggle-survey-2019/other_text_responses.csv /kaggle/input/kaggle-survey-2019/questions_only.csv

  1. dataframe create
1
2
3
4
5
df17= pd.read_csv("/kaggle/input/kaggle-survey-2017/multipleChoiceResponses.csv", encoding="ISO-8859-1")
df18= pd.read_csv("/kaggle/input/kaggle-survey-2018/multipleChoiceResponses.csv", )
df19= pd.read_csv("/kaggle/input/kaggle-survey-2019/multiple_choice_responses.csv", )
df20= pd.read_csv("/kaggle/input/kaggle-survey-2020/kaggle_survey_2020_responses.csv", )
df21= pd.read_csv("/kaggle/input/kaggle-survey-2021/kaggle_survey_2021_responses.csv", )
  1. data 확인하기
1
2
3
4
5
df21 = df21.iloc[1:, :]
#df21.value_counts()
#df21.count

df21.head()

df21.head

  1. data 1개씩 표로 만들어서 불러오기
1
2
3
4
5
6
7
8
9
10
11
12
13
14
15
16
17
18
19
country = (
df21['Q3']
.value_counts()
.to_frame()
.reset_index()
.rename(columns={'index':'country', 'Q3':'Count'})
.sort_values(by=['country'], ascending=False)
)

Wage = (
df21['Q25']
.value_counts()
.to_frame()
.reset_index()
.rename(columns={'index':'Wage', 'Q25':'Count'})
.sort_values(by=['Wage'], ascending=True)
)

Wage

Problem

나라별 임금을 확인 하기 위해
temp에 나라이름과 임금에 대해 넣었다.
C_ls : country list라는 List를 만들어 나라 별로 임금을 뽑을 수 있었다.

1
2
3
4
5
6
# India, Russia, China
temp = df21[['Q3','Q25']]

print(temp['Q3'].unique())

C_Ls = temp['Q3'].unique() #나라이름 뽑아주기

Unique함수

1
2
3
4
5

tempR = temp[temp['Q3'] == str(C_Ls[0])].value_counts()


# 이 경우에는 temp가 가공 할 수 없는 templet이기 때문에 plot을 그릴 수가 없다.

temp_noncalculable


trouble shooting

1
2
3
4
5
6
7
8
9
10
11
12
13
#선생님
temp= df21[['Q3','Q25']]
temp = temp.groupby(['Q3','Q25'])
.size()
.reset_index()
.rename(columns = {0:"Count"})

C_Ls = temp['Q3'].unique()

for i in range(1,len(df21['Q3'])):
temp2 = temp[temp['Q3'] == str(C_Ls[i])]
fig = px.bar(temp2, x='Q25', y='Count',title=C_Ls[i])
fig.show()

선생님의 도움을 받아 for문 안에 나라 이름을 넣어서

모든 나라의 임금을 확인 할 수 있었다.

모든 나라의 임금을 확인 했는데, 차별이 심한 나라를 찾기 힘들었다.

뭐때문에 이 graph를 그리려고 했는지 잃어버렸다.

  1. 한국에서 돈 잘 벌려면 어떤 직업, 어떤 … 을 해야 하는가
  2. 한국보다 평균임금이 더 많은 나라는?
  3. 한국 보다 평균임금이 더 많은 나라는 뭐가 다를까?
  4. 임금에 대한 것을 버려야 할까…

이런 재미있는 Issue에 대해 Note를 만들어 보려고 했는데 ㅎㅎ

코딩 실력이 안된당 흐흐 대회에서 잘 하려는 마음보다는 코드를 더 잘 읽고, 쓰는데 집중하자. ㅠㅠ

D-17 (대회 종료까지)

대회 종료 final version

kaggle in Africa_barH(1-1)

1. Figure


Helper functions

Kgg_Africa 에서는 python 문법 중에서 함수를 만드는 def 을 이용하여 plot들을 정의 해 놓았다.

def 함수명(매개변수):
  <수행할 문장1>
  <수행할 문장2>
  ...

ref. python_Function/Ko.

1.1 horizontal bar graphs

다음 results plot 을 뜯어보며 bar-H를 해석 해 보자.

  1. How does Africa compares with rest of the world?
    1. (Region(Q3)) 응답자 수(Africa/전체, 2021): bar-H

먼저, hBar는 다음과 같이 정의 되었다.

그동암 bar-H에대한 많은 부분을 공부 했으므로 간단히 함수를 중심으로 뜯어 보자.

plotly.express.histogram

1
2
3
4
5
6
7
8
9
10
11
12
13
14
15
16
17
18
19
20
21
22
23
24
25
26
27
28
29
30
31
32
33
34
35
36
37
38
39
40
41
42
43
44
def plotly_hBar(df, q, title, height=400,l=250,r=50,b=50,t=100,):   
fig = px.histogram(df.iloc[1:],
y=q,
orientation='h',
width=700,
height=height,
histnorm='percent',
color='region',
color_discrete_map={
"Africa": "gold", "World": "salmon"
},
opacity=0.6
)

fig.update_layout(title=title,
font_family="San Serif",
bargap=0.2,
barmode='group',
titlefont={'size': 28},
paper_bgcolor='#F5F5F5',
plot_bgcolor='#F5F5F5',
legend=dict(
orientation="v",
y=1,
yanchor="top",
x=1.250,
xanchor="right",)
).update_yaxes(categoryorder='total ascending')

fig.update_traces(marker_line_color='black',
marker_line_width=1.5)
fig.update_layout(yaxis_title=None,yaxis_linewidth=2.5,
autosize=False,
margin=dict(
l=l,
r=r,
b=b,
t=t,
),
)
fig.update_xaxes(showgrid=False)
fig.update_yaxes(showgrid=False)
fig.show()

  1. def plotly_hBar(df, q, title, height=400,l=250,r=50,b=50,t=100,)
    • 함수 plotly_hBar의 정의
    • df, q, title등의 변수를 선언하고 값을 정해줌.
  2. fig 정의
    1
    2
    3
    4
    5
    6
    7
    8
    9
    10
    11
    12
    fig = px.histogram(df.iloc[1:], 
    y=q,
    orientation='h',
    width=700,
    height=height,
    histnorm='percent',
    color='region',
    color_discrete_map={
    "Africa": "gold", "World": "salmon"
    },
    opacity=0.6
    )
  • plotly.express.histogram()
    • plotly의 express Library를 이용하여 histogram을 그려본다.
      • df.iloc[1:]
        • dataframe으로 iloc을 이용하여 컬럼을 가져옴 1행에서부터 끝까지
      • y= q,
        • 나중에 q변수만 정해서 넣어주면 G가 그려진다.
      • orientation= ‘h’,
        • orientation이 h일땐, x
        • orientation이 v일땐, y
        • 를 하라고 공식문서에 써있는데 왜 얘는 이랬는지 알 수 없음 + Histogram plot ???.
      • height = ‘height’,
        • plot의 높이 지정 height=400이라고 함수 정의때 이미 지정 됨.
      • color = ‘region’,
        • 색은 region이라는 변수가 어떤것이냐에 따라 달라짐
      • color_discrete_map={“Africa”: “gold”, “World”: “salmon”},
        • dictionary처럼 Indexing 해 줌.
      • opacity = 0.6
        • 불 투명함의 정도 (0~1, flot)

color_discrete_map
color_discrete_sequence 의 차이
dict with str keys and str values (default {}) ,
(list of str)

plotly.express

  1. fig.update_layout()
    1
    2
    3
    4
    5
    6
    7
    8
    9
    10
    11
    12
    13
    14
    fig.update_layout(title=title, 
    font_family="San Serif",
    bargap=0.2,
    barmode='group',
    titlefont={'size': 28},
    paper_bgcolor='#F5F5F5',
    plot_bgcolor='#F5F5F5',
    legend=dict(
    orientation="v",
    y=1,
    yanchor="top",
    x=1.250,
    xanchor="right",)
    ).update_yaxes(categoryorder='total ascending')

fig.update_layout() :

kaggle in Africa_Fig

1. Introduction

Helper functions


1.1 horizontal bar graphs

Graph의 code 의 경우 해당 data와 연동해서 한꺼번에 보기로 한다.

< plot의 종류 >

  1. plotly_hBar (df, q, title, height=400,l=250,r=50,b=50,t=100,)
  2. plotly_vBar(df, q, title, l=50,r=50,b=50,t=100)
  3. head_count(df, question_num, parts):
    1. head_count function copied from
  4. df_with_percentages(df, q, n, region)
  5. plot_barH_percent(df1, df2, title, l=150, r=50, b=50, t=100)
  6. annotated_heatmap(df_w, df_a, title, width=850)
  7. categorical_scatter(df1, df2, title, l=150, r=50, b=50, t=100)
  8. annotated_heatmap_Trans(df_w, df_a, title, width=850, height=750, l=150)
  9. head_count_suf(df, question_num, part, n)
  10. df_with_percentages_suf(df, q, part, n, region)


위의 코드의 경우 쓰여지지 않은 코드도 있는 것 같지만, 일단 List UP 해 놓음.


1.2 grouping african countries

1.2.1 연도 별 Africa 국가 이름 df

1
2
3
4
5
6
africa17 = ['Nigeria','Kenya', 'South Africa', 'Egypt']
africa18 = ['Nigeria','Kenya', 'South Africa', 'Egypt', 'Tunisia', 'Morocco']
africa19 = ['Nigeria','Kenya', 'South Africa', 'Egypt', 'Tunisia', 'Morocco', 'Algeria']
africa20 = ['Nigeria','Kenya', 'South Africa', 'Egypt', 'Tunisia', 'Morocco', 'Ghana']
africa21 = ['Nigeria','Kenya', 'South Africa', 'Egypt', 'Tunisia', 'Morocco', 'Algeria', 'Ghana', 'Uganda', 'Ethiopia']

  • 아마도 직접 수기로 찾은 것 같다.

1.2.2 국가 이름 확인

  • pd.isin(): List에 존재하는 요소가 대상 dataFrame, series에 존재 여부를 Boolean type으로 반환.
1
2
3
4
5
6
7
8
9
10
11
12
13
14
15
16
17
18
19
20
21
africa = ['Nigeria', 'Egypt', 'South Africa', 'Algeria', 'Tunisia', 'Morocco', 'Kenya', 'Uganda', 'Ghana', 'Ethiopia']

df21_africa = df21[df21['Q3'].isin(africa)]
df21_world = df21[~df21['Q3'].isin(africa )]
df21['region']=["Africa" if x in africa else "World" for x in df21['Q3']]

df20_africa = df20[df20['Q3'].isin(africa)]
df20_world = df20[~df20['Q3'].isin(africa )]
df20['region']=["Africa" if x in africa else "World" for x in df20['Q3']]

df19_africa = df19[df19['Q3'].isin(africa)]
df19_world = df19[~df19['Q3'].isin(africa)]
df19['region']=["Africa" if x in africa else "World" for x in df19['Q3']]

df18_africa = df18[df18['Q3'].isin(africa)]
df18_world = df18[~df18['Q3'].isin(africa)]
df18['region']=["Africa" if x in africa else "World" for x in df18['Q3']]

df17_africa = df17[df17['Country'].isin(africa)]
df17_world = df17[~df17['Country'].isin(africa )]
df17['region']=["Africa" if x in africa else "World" for x in df17['Country']]

‘africa’라는 배열을 만들어 df를 새로 정의

  • 17’~21’까지 같은 내용이므로 21’의 내용만으로 정리

0> df21 data 확인

df21

1> df21[‘Q3’]의 내용은 당신의 나라는 어디 입니까?

df21_Q3

2> 따라서 “ df21[‘Q3’].isin(africa) “ 코드의 의미는 Q3의 대답이 africa 이면 True 반환.

3> 결론적으로 Q3의 대답이 Africa[]인 모든 대답을 추출 하게 된다.

4> 반대로 dfworld의 경우 ~ ( not )을 사용하여 Q3이 false인 data frame을 추출 할 수 있는것.

1.2.3 region column을 추가

1
df21['region']=["Africa" if x in africa else "World" for x in df21['Q3']]

df21 dataframe에 Region이라는 column 을 추가해 보자.

region 컬럼에 들어갈 값은

  1. List의 끝까지 반복하되, 만약 df21[‘Q3’]의 값이 africa에 해당하면 “Africa”, 그 밖의 경우는 world를 입력해라.

df21_Q3

Africa_Region

data science를 잘 하려면, python 문법도 잘 알아야 할 듯.